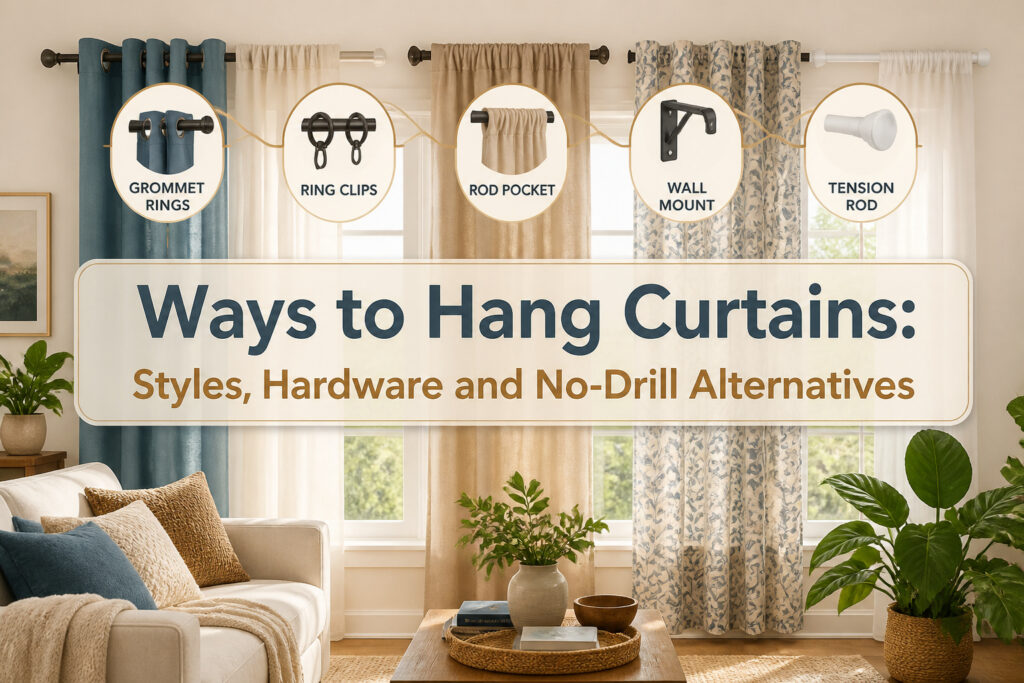
Ways to hang curtains range from grommet rings that glide open for daily use to rod pockets best left stationary, but the hardware you choose locks you into a specific look and function. A rod wider than 60 inches needs at least a 1-inch diameter and a center bracket to prevent bowing, while tension rods and adhesive brackets exist for renters who cannot drill but collapse under anything heavier than sheer cotton.
[link-whisper-related-posts]Grommet and Eyelet Curtains
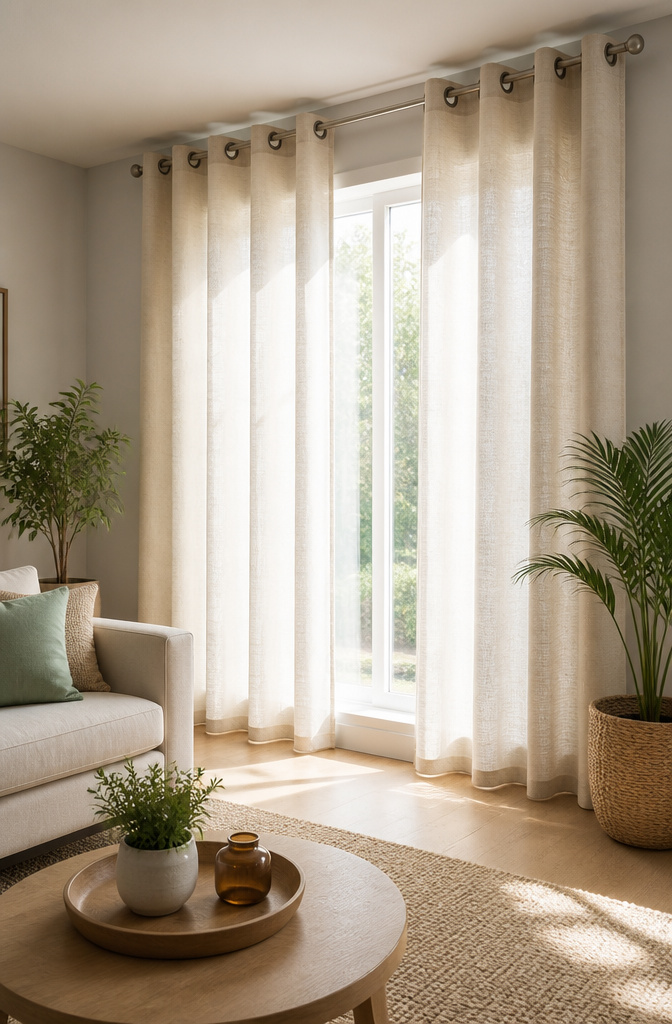
Grommet curtains are the ones with the large metal or plastic rings pressed right into the fabric at the top. The rod threads through each ring, and the result is those clean, uniform S-shaped folds that read as modern without trying too hard.
The metal-ringed openings glide along the rod with almost no resistance, which makes them the best choice for patio doors or any window you open and close daily. That smooth slide matters more than you’d think until you’re wrestling a sticky rod at 7 a.m. with coffee in one hand.
The rings do set a limit on your hardware. The rod has to fit through the grommets, so diameter isn’t a free choice. A rod that’s too thin looks undersized for the window anyway; anything wider than 60 inches needs at least a 1-inch diameter and a center support bracket to keep it from bowing. The tradeoff is worth it for the ease of use, though the small slivers of light that slip through the rings make these a poor fit for a bedroom where total darkness is the goal.
Rod Pocket Curtains
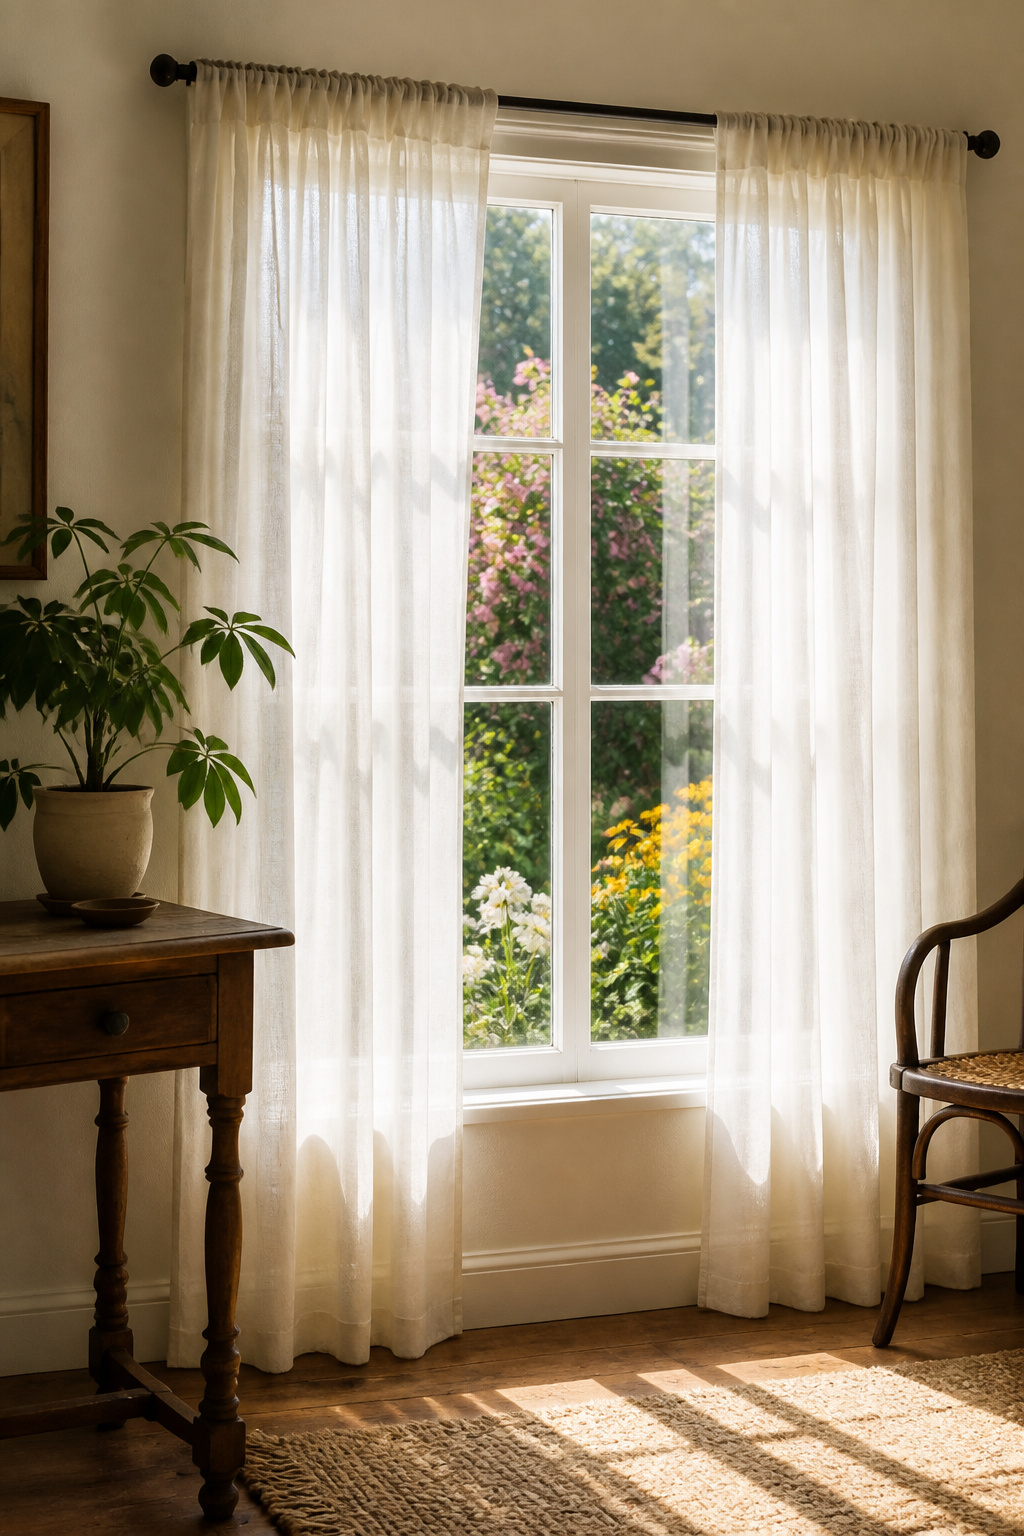
A rod pocket curtain gets its soft, gathered look from a channel sewn straight across the top panel, folded back into itself so the rod threads through and bunches the fabric. That construction is what makes installation simple, but it is also what limits how the curtain moves. The fabric grips the rod along the full width, so drawing these panels open and closed takes real effort and wears the pocket over time. They work best as stationary panels that frame a window rather than ones you operate daily.
The hidden rod does have an advantage: it does not need to look good, only to carry the weight. Light, translucent fabrics suit this style well, since the point is usually filtered light and soft texture rather than complete blackout. If you do want to draw them occasionally, a looser pocket helps, though it still will not glide like rings or grommets. Plan on taking the rod down entirely when the curtains need washing, because there is no quick release.
Pinch Pleat Curtains
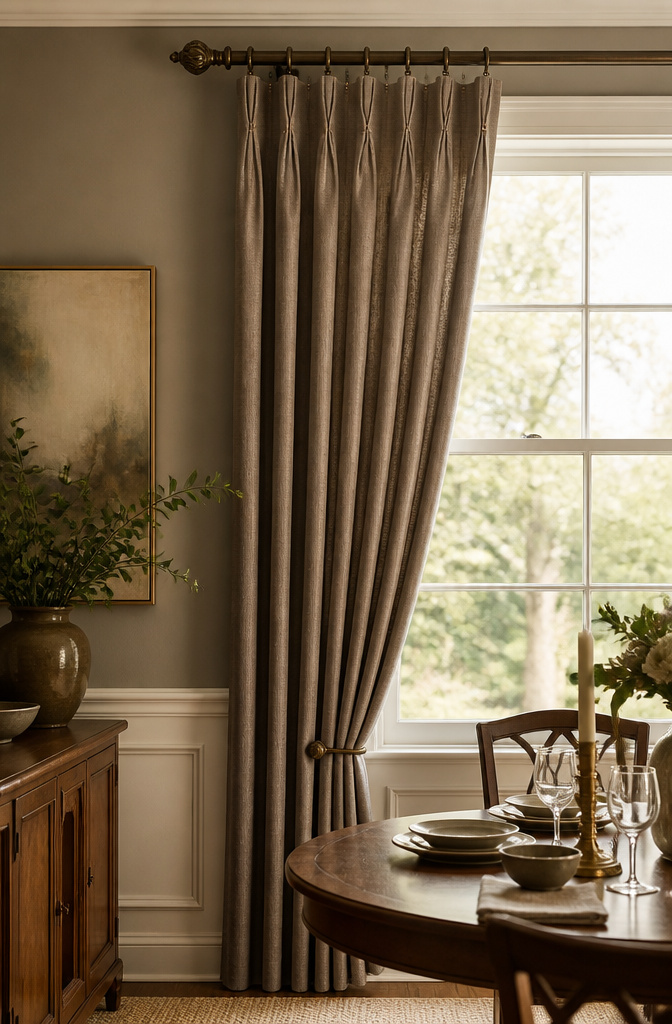
Pinch pleat curtains carry the most formal look of the standard styles, with fabric gathered into tight, stitched bunches at the top that hold their shape whether the panels are open or drawn. The pleats come in several variations: a two-finger pleat, the more common three-finger pleat, and the decorative Goblet pleat, each giving a slightly different level of fullness and structure.
This style needs specific hardware to work. Drapery pins slide into the back of each pleat and hook onto rings, or the panels can hang from a traverse rod with pins. The rings are visible, so most people choose a decorative rod that earns its place in the room rather than hiding it. When you stack pinch pleat curtains open, a pin at both the top and bottom of each pleat trains the fabric to hold a crisp, even fold rather than sagging at the edges.
The finished appearance suits dining rooms and formal living rooms where the curtains are part of the architecture, not an afterthought. The hardware cost runs higher than a basic rod pocket setup, and the installation takes more measuring to space the pins evenly. For a renter on a weekend timeline, this is probably not the first project to tackle; the payoff is in a room that looks intentionally done, not temporarily decorated.
Ripple Fold Curtains
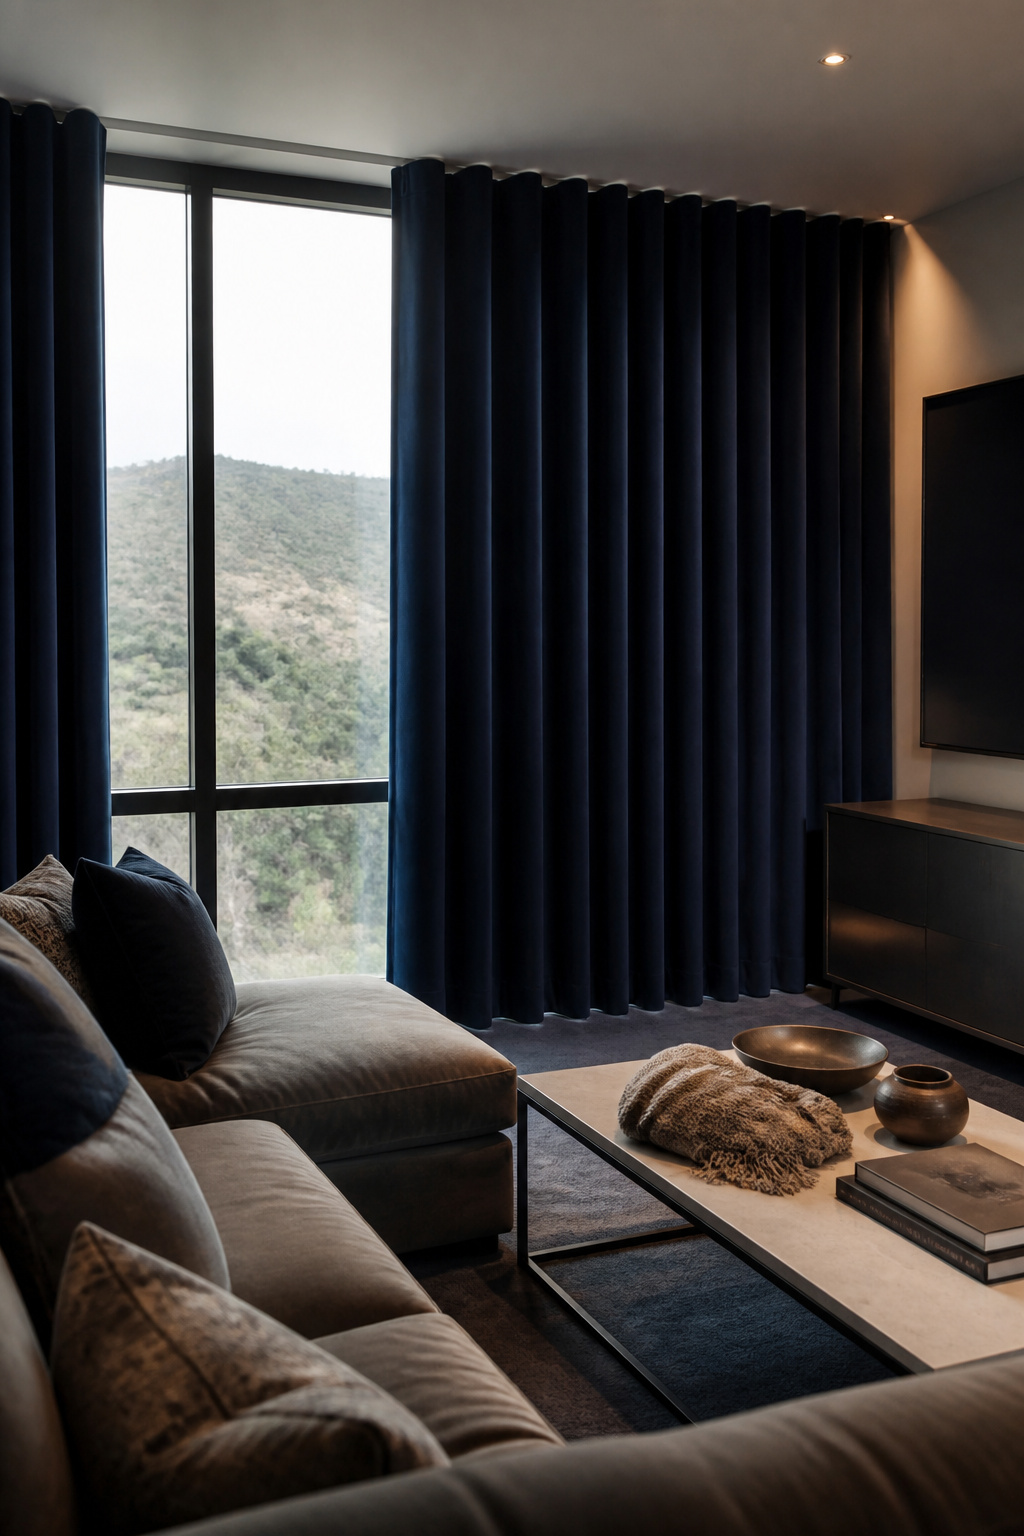
The continuous S-curve of ripple fold curtains comes from the track, not the fabric itself. Small carriers snap into the curtain header at fixed intervals, pulling the cloth into that even, repeating wave. Mount the track to the ceiling and the heading sits flush against it, leaving almost no gap for morning light to slip through. That tight seal is why this style works so well with blackout fabric in a bedroom or media room.
The hardware costs more than a basic rod, and the track has to run level or the wave looks uneven. But for floor-to-ceiling windows where you want that hotel-wall look, the clean line is hard to match with pleats or grommets.
Tab Top Curtains
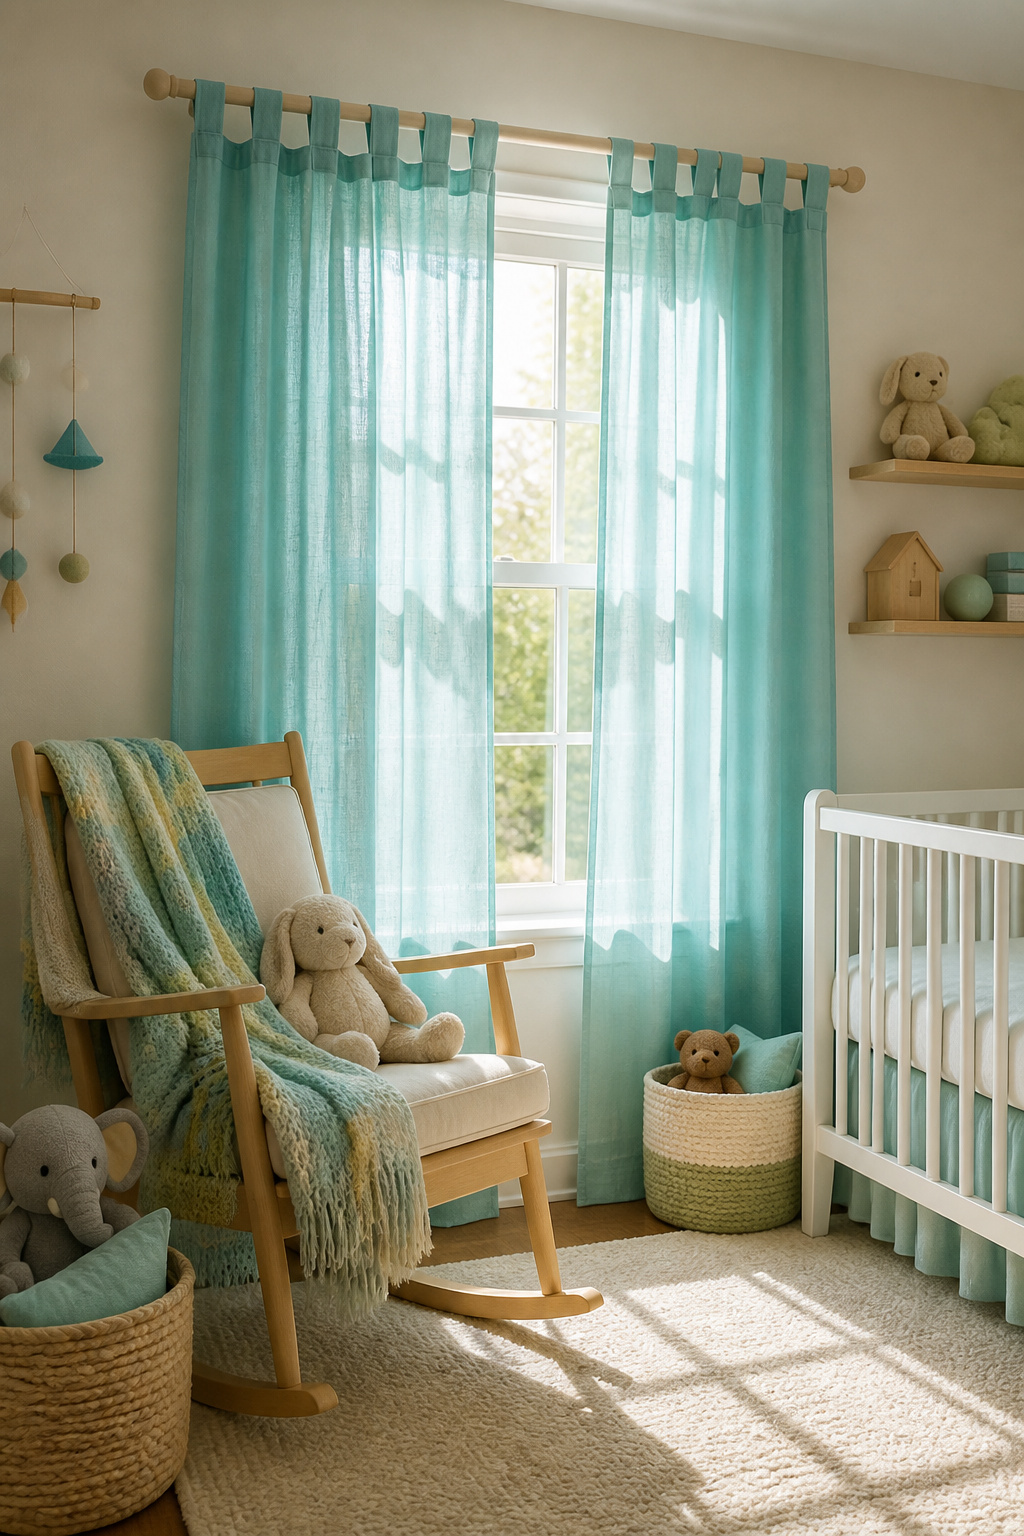
Fabric loops sewn across the top of tab top curtains thread straight onto the rod, skipping rings or hooks entirely. That simplicity gives them a relaxed, slightly rumpled look that reads cottage or kids’ room rather than formal living space. The spacing between tabs is usually even, so the panel hangs in soft folds with the rod itself visible in the gaps.
Back tab curtains work the same way mechanically, but the loops hide on the reverse side so the fabric seems to float below the rod with cleaner pleats. That trade-off costs some of the easygoing charm; the front face looks more tailored, which can feel out of place in a space where you wanted the undone version.
Tabs come in two builds worth knowing. Closed loops have both ends stitched down, which is what most store-bought panels use. Open loops fasten with buttons, snaps, or Velcro on one end, a detail that matters more for cleaning than daily use: open tabs let you take the panel off the rod without lifting the whole thing down. Either way, the style is decorative first and functional second. The rod shows, the stack stays fairly flat, and light leaks around the top more than with a pocket or pleat. For a rental bedroom or a nursery where the vibe matters more than blackout performance, that trade usually works.
Tie Top Curtains

Tie top curtains hang from fabric ribbons sewn directly to the panel, knotted loosely around the rod rather than looped through rings or pockets. The knots stay visible and slightly irregular, which gives the whole window a relaxed, handmade mood that reads more country cottage than designed interior.
Tab tops run in a straight, repeating band across the header, and that regularity makes them feel tidier, almost nautical. Tie tops break that rhythm. The ribbons can be long enough to dangle or cut short for a cleaner bow, and because you tie each one by hand, the curtain sits at slightly uneven intervals. The effect is informal, a little bohemian, and intentionally imperfect.
These work best in lightweight cottons or linens that crush softly where the knot pinches. A heavier fabric fights the gathering and the bow goes bulky. The practical edge is real, though: you can hang or remove the panel without taking the rod down, which matters in a rental when you are working around existing hardware and trying not to disturb the wall.
Crossover Sheer Panels
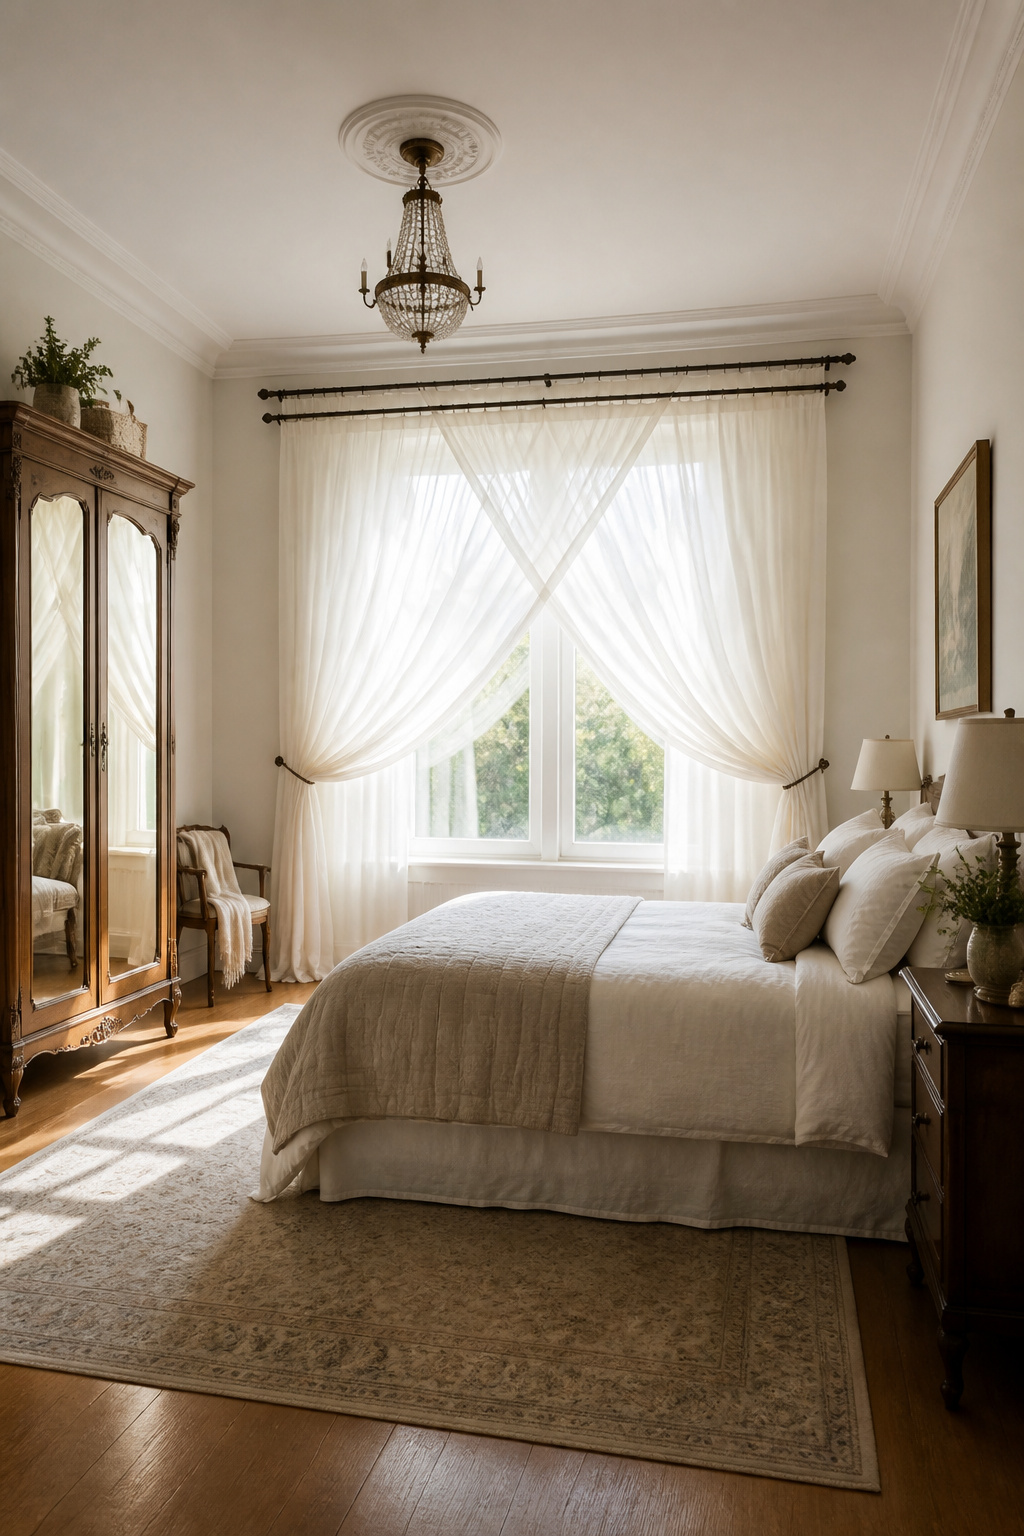
Overlapping sheer panels sit on either a single extended rod or two parallel rods, with the fabric crossing at the center so each panel sweeps to the opposite side. The effect is softer than a single flat panel because the doubled sheer diffuses light twice and breaks up the view from outside. Two rods set a few inches apart make the layering easier to control, especially if you want to add heavier drapes on the outer rod later for nighttime privacy. A single rod works if the space is tight, but you will need curtain rings to clip the panels far enough apart that they can cross without bunching.
This style lives in rooms where you want daylight but not exposure. Living rooms and bedrooms are the usual fit. The sheers give enough cover for daytime use, and the crossover point at the center blocks the straight sightline better than panels that simply meet in the middle. Tiebacks or holdbacks keep the sweep tidy when you want the window fully open. Metal holdbacks read more formal; fabric tiebacks keep the mood casual. Either way, secure the overlap with rings, not a single rod pocket, or the panels will slide back to center every time you touch them.
DIY Curtain Rods

Store-bought rods are not the only way to span a window. A straight branch, stripped of bark and sanded smooth, needs two sturdy brackets and works best with lightweight cotton or sheer panels that will not stress the wood over time. Rowing oars give the same handmade feel with a built-in grip for rings; large curtain rings slide easier and keep the nautical look intact. Vintage yardsticks or reclaimed wood demand a center support bracket if the span clears 30 to 40 inches, or the middle will bow. Iron pipe carries more weight than any of these, but the hardware store fittings add up, and the industrial look is not for every room. For heavy blackout curtains, none of these beat a conventional rod with at least a 1-inch diameter and a center bracket, because fabric that blocks light also pulls hard on whatever holds it.
Canvas Drop Cloth Curtains

Canvas drop cloths solve the closet-door problem without a trip to the fabric store. A standard 6-by-9-foot drop cloth runs about fifteen dollars at any hardware store, and that length is enough to cover most standard closet openings with material left over for pooling at the floor. The raw edge at the bottom is the point: the factory hem is utilitarian, not decorative, and leaving it unfinished keeps the look casual rather than half-measured.
Mount a curtain rod above the frame. If the closet has wood trim, no-drill brackets grip the molding without screws. Wash the cloth first so it softens, then fold the top over the rod and clip it with curtain rings. No sewing, no hem, no hardware beyond the rod and rings. The canvas weight matters: lighter cloths billow, but the heavy weave of a painter’s drop cloth hangs straight and blocks light well enough that the closet contents stay hidden.
Curtains as Headboard or Decor
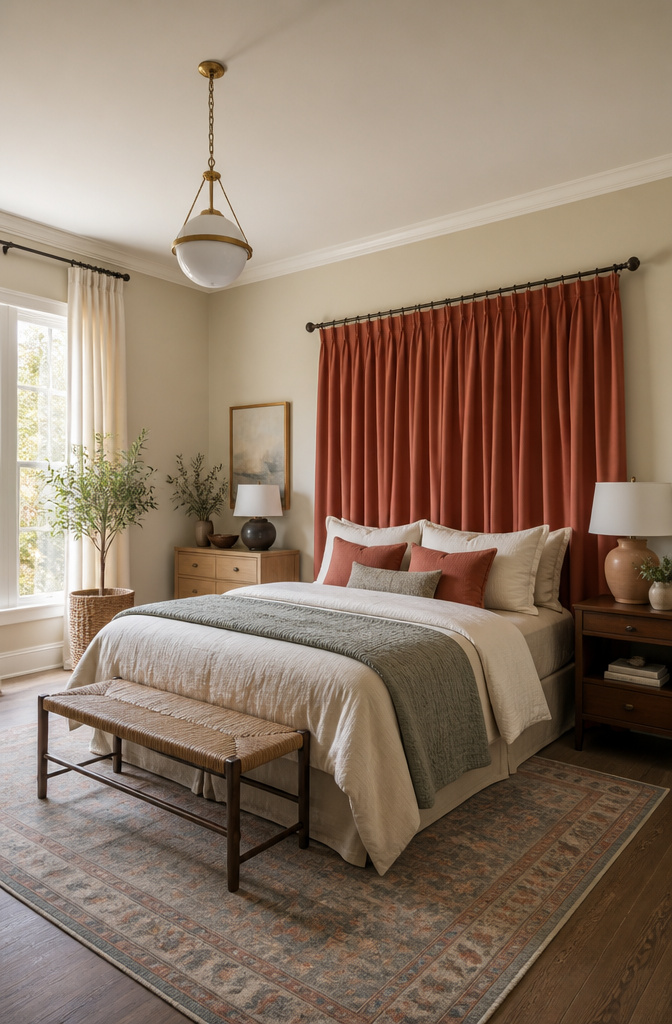
A curtain rod mounted behind the bed at the desired height turns fabric into a soft headboard alternative that costs less than most upholstered ones and changes out faster than paint. Standard fullness calls for panels twice the bed width; deluxe runs two and a half times that, and maximum fullness hits three times. A center support bracket keeps the rod from sagging across wider spans.
The same hardware setup works for script or stenciled text panels, though the material matters more here. Cotton or linen holds paint crisply where synthetics might bleed. Mount the rod at ceiling height and let the words read from standing eye level, or drop it lower for impact only visible once you’re in the bed. Either way, hem the bottoms or tuck them behind the mattress; visible pooling on the floor shifts the look from intentional to sloppy fast.
Boho Scarf Curtains

Vintage silk scarves with hand-rolled edges hold up better than the thin polyester ones that fray where the knot grips. Tie them directly to the rod for a fixed panel, or use curtain rings if you need to slide them open. The weight sits at each knot point, so a lightweight scarf every six to eight inches keeps the drape even without sagging. Heavier fabrics bunch and the rod bows; I would skip anything thicker than a standard square neck scarf. The look works best when the scarves overlap slightly, which means buying more than you think. Opening and closing daily wears the knots fuzzy, so this is a style for windows that stay dressed one way.
Curtain Height Above the Frame
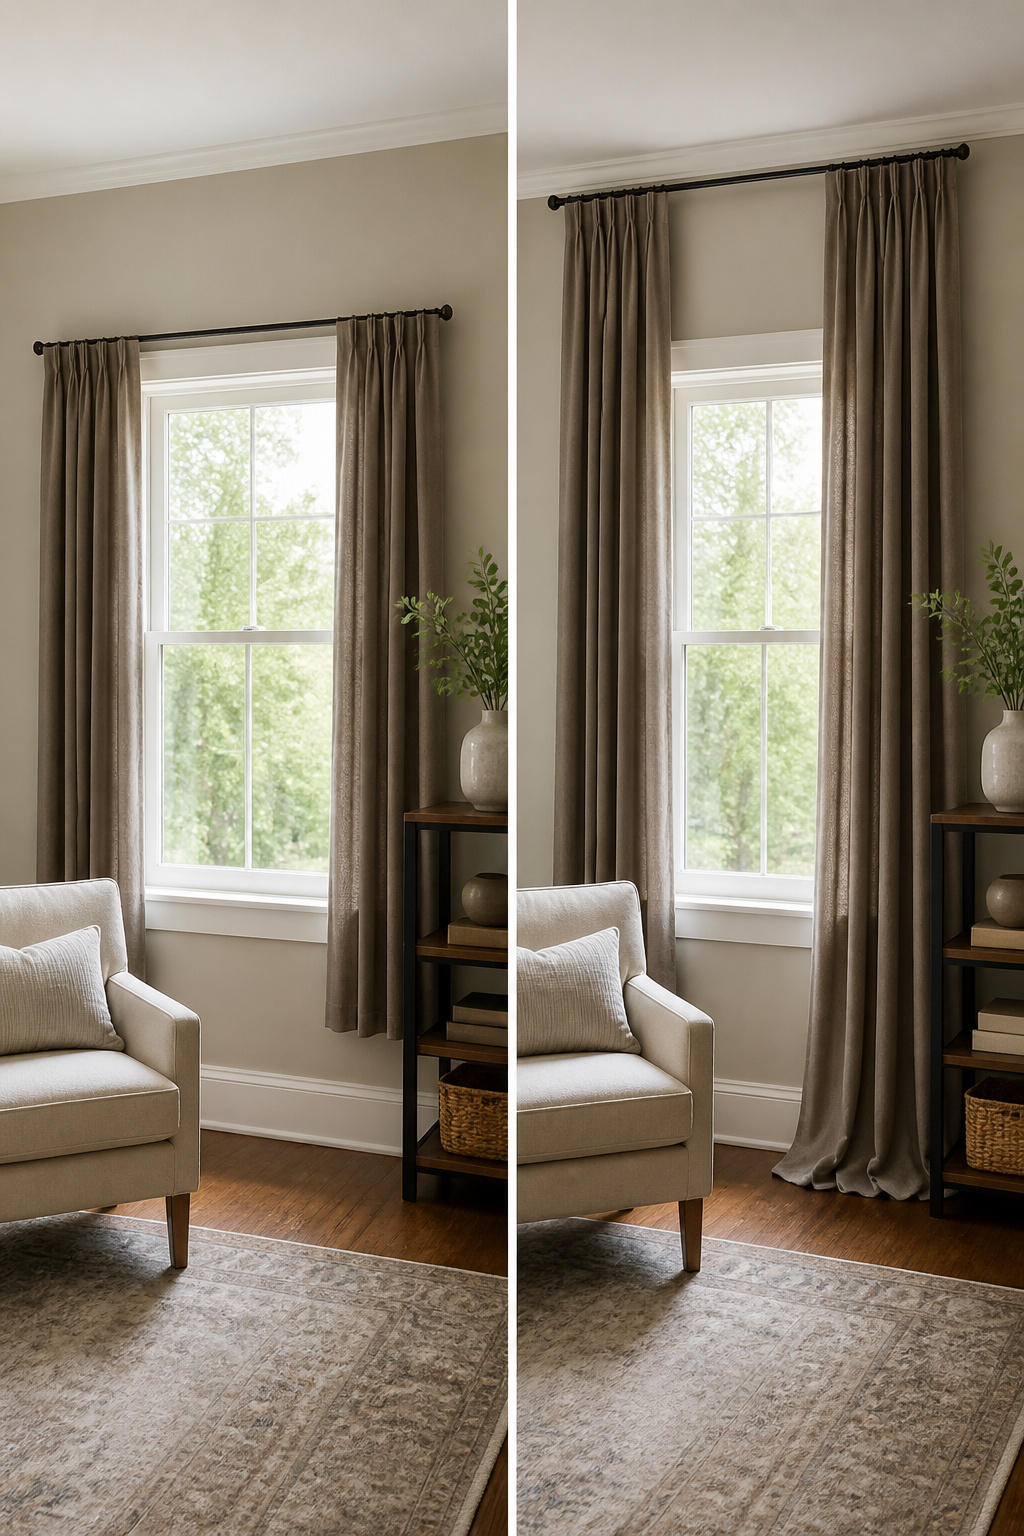
The standard placement for a curtain rod sits 4 to 6 inches above the window frame. That gap is enough to lift the eye without turning the wall above the window into an awkward blank strip.
In an eight-foot room, that 4- to 6-inch rule is about as high as you want to go. Push the rod much closer to the ceiling and the proportions start to feel stretched, like the curtains are trying to escape the window rather than frame it.
Higher ceilings give you more room to stretch. Mounting the rod halfway between the top of the window frame and the ceiling draws the gaze upward and lets the height read as intentional rather than leftover. The same 4- to 6-inch minimum still applies as a floor, not a target.
Curtain Width Past the Frame
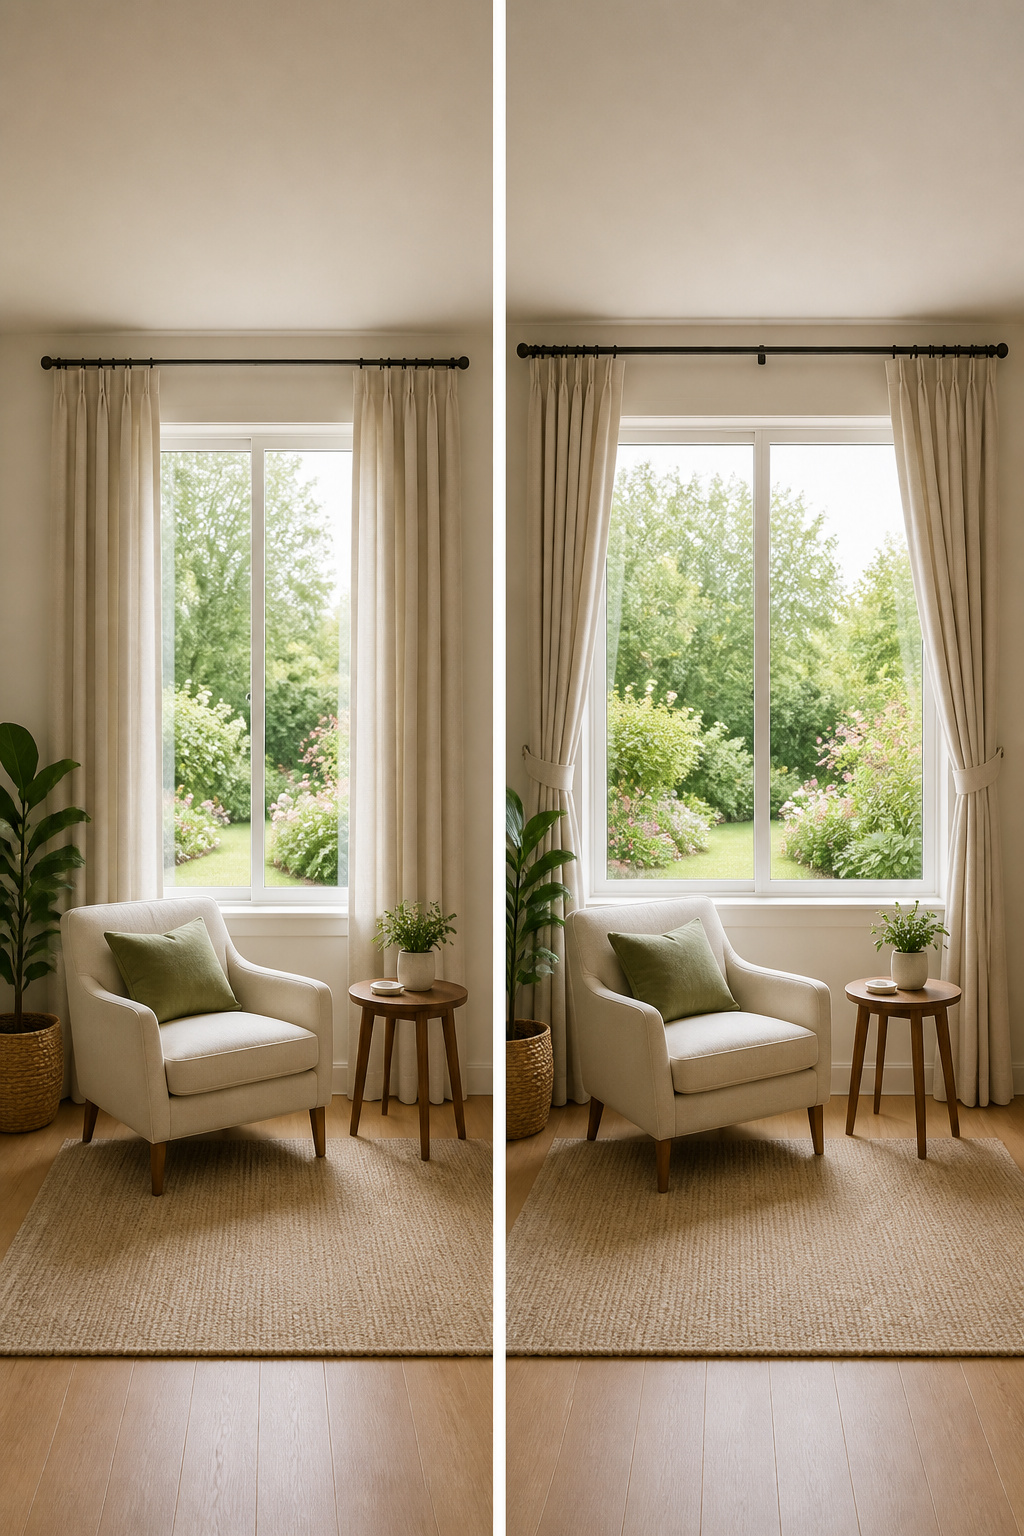
Extending the rod past the frame is where most rooms either get their lift or stay cramped. Three to six inches on each side is the workable range, and the difference it makes is immediate. When the panels stack clear of the glass, the light that actually enters the room roughly doubles, and the wall reads as one continuous surface rather than a window with fabric parked in front of it.
I used to measure rods to the casing and stop there. The curtains would bunch over the trim, blocking a slice of glass I had not accounted for, and the window always looked smaller than it was. Adding that extra width pushes the eye outward. For a 50-inch window, the rod lands between 56 and 62 inches total, which sounds minor until you see the panels sitting flat against the wall instead of crowding the view.
Wide windows can take more, up to 8–10 inches each side, though the 3–6 rule handles most rooms I have planned for. The cost is just the longer rod and possibly an extra bracket in the center. The payoff is a window that looks intentionally framed rather than accidentally covered.
Fullness and Panel Width

The total width of your curtain panels should run 1.5 to 3 times the window width, and where you land in that range changes the whole look when the curtains are drawn. At 1.5 times, the fabric sits in shallow, tidy folds that read as tailored and modern. Push toward 2 times and the gathers get deeper and softer. At 3 times, the curtains pool into dense, almost theatrical ripples that read as formal or romantic, depending on the fabric.
Fabric weight pulls that number up or down in practice. A heavy linen or thick velvet already carries visual bulk, so it can look full at the lower end of the range without seeming skimpy. Sheers and lightweight cottons disappear into themselves unless you give them more width to work with; they need the upper multipliers just to register as gathered rather than flat. I learned this the hard way ordering linen-look panels that were listed as medium weight but arrived closer to bedsheet density. At 1.5 times they hung like a flat sheet on a rod, and I ended up doubling the order to get the depth I wanted.
Measuring Before You Buy

- Add 3–6 inches of rod past each side of the window frame, up to 8–10 inches on wide windows, so the panels stack off the glass when open. The combined panel width should then be 1.5–2 times that final rod length, or up to 3 times if you want heavier fullness.
- For height, mark where the rod will actually sit. The usual mark is 4–6 inches above the frame, or halfway between the frame top and ceiling if the room has standard height or more. That spot is your starting point, not the ceiling itself.
- Measure from that rod mark down to where you want the fabric to finish. A modern hem kisses the floor or floats about ½ inch above it; a 1–3 inch puddle reads more traditional. The number you get here is the raw length.
- Subtract the rod diameter from that raw length if you are measuring to the floor or aiming for a specific break point. The rod sits above your measurement point, so the fabric starts its drop from the underside of the rod, not the center. Skip this and the hem lands lower than planned.
- If you are wrapping panels around the sides to block light, check the return depth, the distance from the wall to the front of the rod. The bracket projection changes how far the fabric has to travel before it even starts its downward drop.
Hardware That Holds

The bracket is the part you actually see, but what happens at the wall is what keeps your curtains from landing in your lap. Drywall alone won’t hold; I learned to feel for studs first, and when I hit hollow space, a wall anchor tapped flush with a hammer beats any screw driven straight into crumbly board. For spans past six feet, a center support bracket isn’t optional—it’s what keeps the rod from bowing in the middle under the weight of lined panels.
Finials are mostly decorative, though they do keep rings from sliding off. Speaking of rings: they need to run at least half an inch larger than the rod diameter or they bind and skip. Grommets slide directly on the rod and move smoother, but they commit you to one look; rings let you swap clips for hooks if you change your mind about the header later.
No-Drill Options for Renters
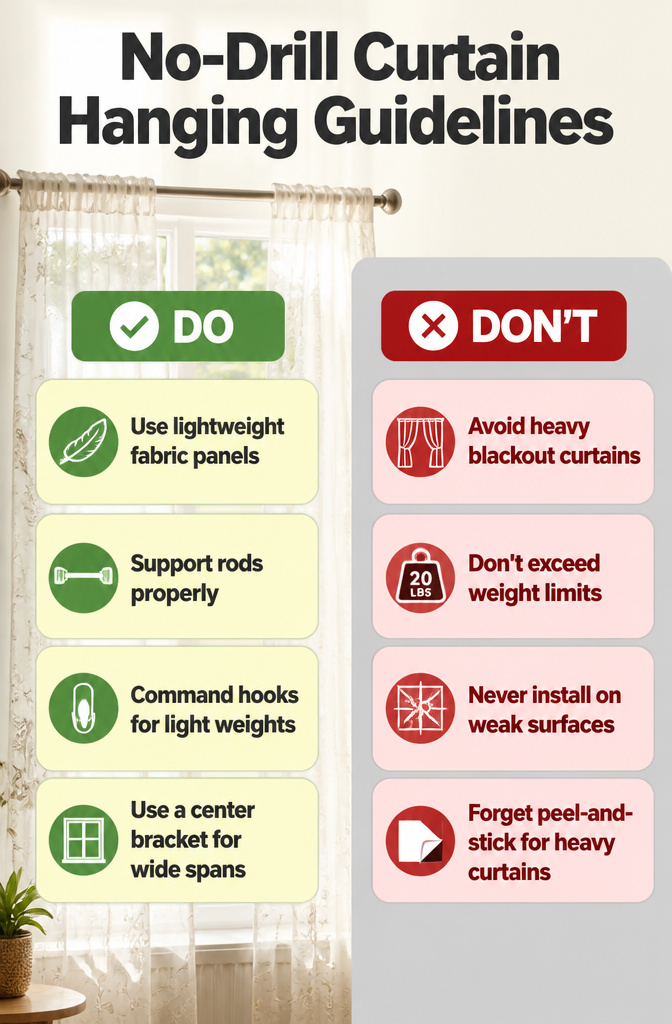
Tension rods work best inside a window frame where the walls themselves carry the load, but the catch is weight. Stick to sheer or lightweight cotton panels; anything heavier and the rod collapses on you. I have seen people try blackout curtains on these, and the sag starts within a week.
Adhesive brackets and command-hook systems sit on the surface instead, which sounds forgiving until you check the numbers. The no-drill brackets that tap into a window frame claim up to 20 lbs, which handles most lined panels if the frame is solid wood. True adhesive, the peel-and-stick kind, runs lower, and the failure mode is worse: it lets go without warning, usually at night, usually onto a radiator or a sleeping cat.
For a span past 30–40 inches, even a sturdy rod needs a center bracket. Without one, the bow is inevitable. The tension rod avoids this by design, but only because it is never meant to carry enough weight to bow in the first place. Sheers and café curtains are the realistic ceiling here; anything with lining, interlining, or velvet wants a drilled bracket or a frame you can tap into.
Frequently Asked Questions
How high should I hang my curtain rod?
Hang the rod 4 to 6 inches above the window frame for standard ceilings. In rooms with higher ceilings, mount it halfway between the top of the frame and the ceiling to draw the eye upward without stretching the proportions. In an eight-foot room, pushing much closer to the ceiling makes the curtains look like they are trying to escape the window rather than frame it.
How wide should the curtain rod be?
Extend the rod 3 to 6 inches past each side of the window frame, or up to 8 to 10 inches on wide windows. This lets the panels stack completely off the glass when open, which roughly doubles the light that enters and makes the wall read as one continuous surface rather than a window with fabric parked in front of it.
What is the right curtain length?
A modern hem should kiss the floor or float about ½ inch above it. A 1 to 3 inch puddle reads more traditional and romantic. Measure from the actual rod position down to where you want the fabric to finish, then subtract the rod diameter so the hem lands where you planned rather than lower.
How full should curtains be?
Aim for a total panel width of 1.5 to 3 times the window width. At 1.5 times the fabric sits in shallow, tidy folds that read modern; at 3 times it pools into dense, theatrical ripples. Heavy fabrics like velvet look full at the lower end, while sheers and lightweight cottons need the upper multipliers just to register as gathered rather than flat.
What are the different curtain hanging styles?
The main styles are grommet and eyelet, rod pocket, pinch pleat, ripple fold, tab top, and tie top. Grommets glide smoothly and suit daily use; rod pockets work best as stationary panels; pinch pleats carry a formal look for dining rooms; ripple folds mount flush to the ceiling for blackout performance; tab tops and tie tops read relaxed and informal.